How to wrap menu items in SharePoint 2013 global navigation?

This is a quick post to show the code snippet I used to wrap the global navigation items in SharePoint 2013. You can also use custom CSS code in order to get some space between navigation lines and items. First, open default masterpage of your site collection and find the following:

<SharePoint:AspMenu
   ID="TopNavigationMenu"
   Runat="server"
   EnableViewState="false"
   DataSourceID="topSiteMap"
   AccessKey="<%$Resources:wss,navigation_accesskey%>"
   UseSimpleRendering="true"
   UseSeparateCss="false"
   Orientation="Horizontal"
   StaticDisplayLevels="2"
   AdjustForShowStartingNode="true"
   MaximumDynamicDisplayLevels="2"
   SkipLinkText="" />

and replace with the code below:

<SharePoint:AspMenu
   ID="TopNavigationMenu"
   Runat="server"
   EnableViewState="false"
   DataSourceID="topSiteMap"
   AccessKey="<%$Resources:wss,navigation_accesskey%>"
   UseSimpleRendering="false"
   UseSeparateCss="false"
   Orientation="Horizontal"
   StaticDisplayLevels="2"
   AdjustForShowStartingNode="true"
   MaximumDynamicDisplayLevels="2"
   SkipLinkText=""
   ItemWrap="true"
   RenderingMode="List" 
   cssClass="mycss"/>

As you can see, the only diference is:

ItemWrap="true"
RenderingMode="List"
cssClass="mycss"

Create custom CSS file with the following content:

.mycss .level1
{
margin-left: 10px;
margin-right: 20px;
}
.mycss .level2
{
margin-left: 10px;
margin-right: 20px;
}
.mycss .level3
{
margin-left: 10px;
margin-right: 20px;
}

How Office 365 manages DNS records for mail service?

When you set up Office 365,  you might have a choice between managing your own DNS records at your DNS hosting provider and having Office 365 create and manage the DNS records for your domain.  I definitely recommend letting  your existing hosting provider or domain registrar to manage your records, because in case you decide to host MX records outside of Office 365 , it will not be possible. Simply, you can’t change your DNS records to host email outside of Office 365.

Enable XML attachments on Exchange Online

    1. Right click on the PowerShell Console icon and chose the option: Run as administrator.
    2. To change the Execution policy open the Microsoft Online Services Module for Windows PowerShell and type the command:
      Set-ExecutionPolicy unrestricted
    3. For creating the remote connection we will need to use  a set of three PowerShell commands. Each command perform different task and include variable that serve as a “container” for information such as: user credentials, URL etc. Execute the following command: 
      $cred = Get-Credential
      $Session = New-PSSession -ConfigurationName Microsoft.Exchange -ConnectionUri https://ps.outlook.com/powershell/ -Credential $cred -Authentication Basic –AllowRedirection
      Import-PSSession $Session
    4. A pop out windows will appear. Type your credentials by using the UPN (user Principal name) format. User should have global administrator rights in the office 365 environment. To view all the allowed file type, you can use this command:
      (get-OwaMailboxPolicy OwaMailboxPolicy-Default).AllowedFileTypes
    5. To allow a specific file type (such as .xml file), use this command: 
      Set-OwaMailboxPolicy OwaMailboxPolicy-Default -AllowedFileTypes  @{add= '.xml'} Get-OwaMailboxPolicy | Set-OwaMailboxPolicy -BlockedFileTypes @{Remove = ".xml"}
      Get-OwaMailboxPolicy | Set-OwaMailboxPolicy -AllowedFileTypes @{Add = ".xml"}
      Get-OwaMailboxPolicy | Set-OwaMailboxPolicy -BlockedMimeTypes @{Remove = "text/xml", "application/xml”}
      Get-OwaMailboxPolicy | Set-OwaMailboxPolicy –AllowedMimeTypes @{Add = "text/xml", "application/xml”}
    6. Disconnect the remote connection with the following command:
      Remove-PSSession $Session

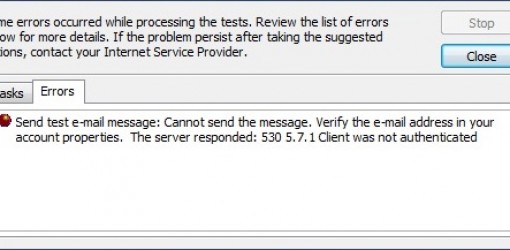
530 5.7.1 Client was not authenticated

Exchange Online implementation for new customers also includes local Outlook settings in order to send/receive messages from desktop application. Few days ago, users have reported the following error: “530 5.7.1 Client was not authenticated” during account setup in Outlook 2010/2013.

This kind of issue is cause by incorrect SMTP authentication setting.


  1. From the File menu, select “Info” and choose “Account Settings”
  2. Select your account and click the “Change” button above.Click the “More Settings…” button in the bottom-right corner of the E-Mail Accounts window.
  3. In the Internet Email Settings window, click the “Outgoing Server” tab.
  4. Ensure that the box next to “My outgoing server (SMTP) requires authentication” is checked and “use same settings as my incoming mail server” is selected.


You need a more recent version of SharePoint Designer in SPD 2013?

If you try to open sharepoint site in SharePoint designer you may get following error: “Server error: The version of Microsoft SharePoint Foundation running on the server is more recent than the version of SharePoint Designer that you are using. You need a more recent version of SharePoint Designer.”


Solution: In SPD go to Account > Switch Account and type in the credentials of the site you are trying to open (it defaults to your Microsoft Login)

Office 365 password expiration policy

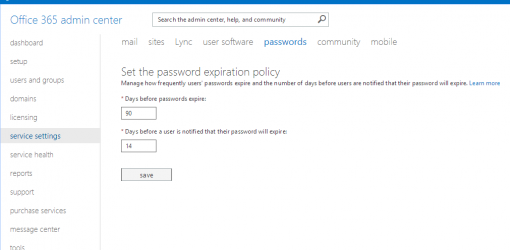
If you’re a business admin, managing Office 365 may be only one of your functions in a long list of job duties, so keeping the experience simple is key. Fortunately, simplicity and efficiency go hand in hand with new and improved Office 365 admin options. End users don`t like password changes, and very often cannot understand all those security risks behind it. Password expiration policy is a part od service settings like anything else and could be modified in any time. By default, password expiration policy is set to 90 days, with user notification 14 days before expiration date. If you need to change those value, here are the steps:

  1. Log in to Office 365 administration
  2. Select “Service settings” from left menu
  3. Select “Password” page
  4. Update provided fields with new values
  5. Save

How to manage RSS options on SharePoint site?

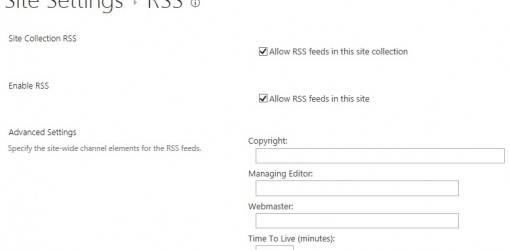
In a few SharePoint implementations, clients asked about managing RSS? RSS settings for each site are available under Site Settings – RSS, with options to enable or disable RSS for site collection or site and copyrights parameters. All you have to do is to select or deselect those check boxes.

Multiple Office 365 subscriptions and cancellation?

If you have multiple Office 365 subscriptions (for example E3 licences bought directly by credit card and E3 licences allocated via Enterprise agreement) and you need to cancel direct Office 365 subscription paid by credit card, the main question is how to switch those licenses without loosing mailbox and other settings?


It is very simple!


After cancelling the direct Office 365 subscription, system will recognize EA licenses automatically. You can contact your regional billing support team to proceed subscription cancellation.

How to move existing O365 users to Enterprise Agreement?

  1. After paying for the Microsoft Enterprise Agreement, there should be an email which confirms the information that you have successfully bought it. In that email, there is a link that will lead you to bind the licenses with your Office 365 subscription.
  2. Click that link and there will be the page asking for your existing Office 365 administrator account credentials.
  3. Finish the process with the wizard.
  4. Then you can sign in to Office 365 admin center to assign the licenses to your existing users and then reduce the “previous” licenses if necessary.