Problem with Sent Items in Outlook 2013 & 2016 IMAP

For many IMAP server settings, Outlook 2013 & 2016 try to determine the correct folders automatically, but unfortunately without success.


The result is that Outlook will ignore the already existing Sent Items and Deleted Items folder on the server and create some local ones of its own. Usually, you cannot also send or delete messages because your Outlook seems “offline”, but the only problem is that IMAP support in new version is not working as we expect.

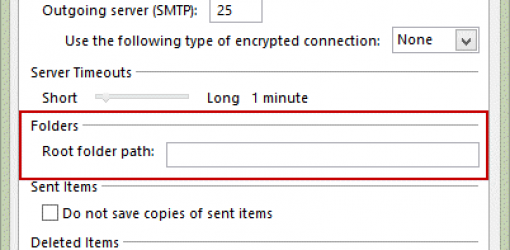
All you have to do is to set the “Root folder path” option in your account settings, and Outlook will recognize the correct folders.


  1. File-> Account Settings-> Account Settings
  2. Double click on your IMAP account.
  3. Select “More Options”, then “Advanced”
  4. Option: Root folder path
  5. Usually setting this to “Inbox” will resolve the probem.

Outlook 2016 Search Not Working

Microsoft Outlook 2016 problem with POP & IMAP content searching? Microsoft Office 365 ProPlus installation contains Outlook 2016 as a standard application with search capabilities, but somehow many users reported problems with mail search for IMAP accounts.   I did manage to find tons of helpful notes on the web which helped me to understand the problem, and I would like to share solution in a few steps:


Remove Outlook 2016 from Index:

  1. Go to Outlook Settings (File | Options)
  2. Go to the Search settings
  3. Click on Indexing Options
  4. Click Modify and deselect Microsoft Outlook
  5. Click Close to dismiss dialog box
  6. Exit Outlook

Check OST and PST permissions:

  1. Find all OST and PST files that you’re using on your computer. In Windows 8, OST files are usually hidden and stored in the C:\Users\[username]\AppData\Local\Microsoft\Outlook folder.
  2. For each file you’re using, right click on the file(s) and select Properties
  3. Click on the Advanced button on the general tab
  4. Ensure that the Allow this file to have contents indexed in addition to file is checked

Add Outlook 2016 to Index:

  1. Start Outlook, go to the Indexing Options, and add Microsoft Outlook back to the list.
  2. Rebuild Index

How to enable archive mailbox in Office 365?

All Exchange Online plans (except Kiosk plans) has the option to enable an in-place email archive. By default, on all plans, the in-place email archive is disabled for all users. An administrator must enable it before it can be accessed. The in-place email archive foldersare stored only in the cloud. The main question is how to enable this option?

  • Access your Office 365 administration using the administrator credentials
  • Select the mailbox you would like to enable archiving option
  • On the right  pane  you will see In-Place Archive
  • Select Enable
  • A new screen will appear asking you if you are sure you wish to enable this feature, click Yes
  • In-Place archive is enabled!


Enable XML attachments on Exchange Online

    1. Right click on the PowerShell Console icon and chose the option: Run as administrator.
    2. To change the Execution policy open the Microsoft Online Services Module for Windows PowerShell and type the command:
      Set-ExecutionPolicy unrestricted
    3. For creating the remote connection we will need to use  a set of three PowerShell commands. Each command perform different task and include variable that serve as a “container” for information such as: user credentials, URL etc. Execute the following command: 
      $cred = Get-Credential
      $Session = New-PSSession -ConfigurationName Microsoft.Exchange -ConnectionUri https://ps.outlook.com/powershell/ -Credential $cred -Authentication Basic –AllowRedirection
      Import-PSSession $Session
    4. A pop out windows will appear. Type your credentials by using the UPN (user Principal name) format. User should have global administrator rights in the office 365 environment. To view all the allowed file type, you can use this command:
      (get-OwaMailboxPolicy OwaMailboxPolicy-Default).AllowedFileTypes
    5. To allow a specific file type (such as .xml file), use this command: 
      Set-OwaMailboxPolicy OwaMailboxPolicy-Default -AllowedFileTypes  @{add= '.xml'} Get-OwaMailboxPolicy | Set-OwaMailboxPolicy -BlockedFileTypes @{Remove = ".xml"}
      Get-OwaMailboxPolicy | Set-OwaMailboxPolicy -AllowedFileTypes @{Add = ".xml"}
      Get-OwaMailboxPolicy | Set-OwaMailboxPolicy -BlockedMimeTypes @{Remove = "text/xml", "application/xml”}
      Get-OwaMailboxPolicy | Set-OwaMailboxPolicy –AllowedMimeTypes @{Add = "text/xml", "application/xml”}
    6. Disconnect the remote connection with the following command:
      Remove-PSSession $Session

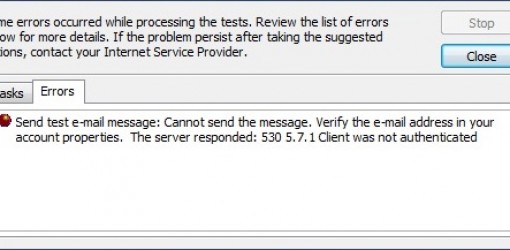
530 5.7.1 Client was not authenticated

Exchange Online implementation for new customers also includes local Outlook settings in order to send/receive messages from desktop application. Few days ago, users have reported the following error: “530 5.7.1 Client was not authenticated” during account setup in Outlook 2010/2013.

This kind of issue is cause by incorrect SMTP authentication setting.


  1. From the File menu, select “Info” and choose “Account Settings”
  2. Select your account and click the “Change” button above.Click the “More Settings…” button in the bottom-right corner of the E-Mail Accounts window.
  3. In the Internet Email Settings window, click the “Outgoing Server” tab.
  4. Ensure that the box next to “My outgoing server (SMTP) requires authentication” is checked and “use same settings as my incoming mail server” is selected.


How to create email alias in Office 365 Small Business Premium?

1) Log into the admin center with the admin account.
2) Click the “Outlook” tab in the top panel to enter OWA (Outlook Web App).
3) In the address bar, change the URL after “owa” to “ecp”. For example, if the URL of your Outlook Web App is https://server.outlook.com/owa/?exsvurl=1&ll-cc=1033&modurl=0&realm=domain.onmicrosoft.com, please change it to https://server.outlook.com/ecp/ to enter your Exchange admin center.
4) Click recipients on the left navigation.
5) Click mailbox on the right panel and double-click the display name of the mailbox you want to edit.
6) Click email address on the left navigation.
7) Click add icon to add an email address for this account.

Sorry, we can’t get that information right now. Please try again later. If the problem continues, contact your helpdesk.

Exchange online error: Sorry, we can’t get that information right now. Please try again later. If the problem continues, contact your helpdesk.

Solution:

  1. Log in to the portal of Office 365 through https://portal.microsoftonline.com/ with an administrator account.
  2. Click Add users, reset passwords, and more under users & groups.
  3. Select the “failed user”  .
  4. Click licenses.
  5. Uncheck the box of Exchange Online and click save.
  6. Wait for 15 minutes, re-do the steps above and check the box of Exchange Online.
  7. Click save and try again.

Messages sent from a shared mailbox aren’t saved to the Sent Items folder of the shared mailbox in Outlook 2013

SOLUTION:

  1. Click Start, click Run, type regedit, and then click OK.
  2. Locate and then click the following registry subkey:
    HKEY_CURRENT_USER\Software\Microsoft\Office\15.0\Outlook\Preferences
  3. On the Edit menu, point to New, and then click DWORD Value.
  4. Type DelegateSentItemsStyle, and then press Enter.
  5. Right-click DelegateSentItemsStyle, and then click Modify.
  6. In the Value data box, type 1, and then click OK.
  7. Exit Registry Editor.