Office 365 password expiration policy

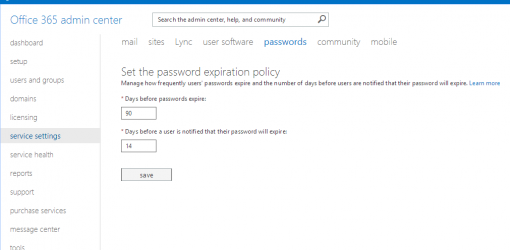
If you’re a business admin, managing Office 365 may be only one of your functions in a long list of job duties, so keeping the experience simple is key. Fortunately, simplicity and efficiency go hand in hand with new and improved Office 365 admin options. End users don`t like password changes, and very often cannot understand all those security risks behind it. Password expiration policy is a part od service settings like anything else and could be modified in any time. By default, password expiration policy is set to 90 days, with user notification 14 days before expiration date. If you need to change those value, here are the steps:

  1. Log in to Office 365 administration
  2. Select “Service settings” from left menu
  3. Select “Password” page
  4. Update provided fields with new values
  5. Save

How to hide new pages in managed metada navigation?

When you use managed metadata options for global navigation on SharePoint site, you may face the problem with new pages. By default it is automatically visible next to regular top navigation items. In many cases, we need to hide those pages.


Simply, deselect option “Add new pages to navigation automatically” as shown on image. Good luck!

Multiple Office 365 subscriptions and cancellation?

If you have multiple Office 365 subscriptions (for example E3 licences bought directly by credit card and E3 licences allocated via Enterprise agreement) and you need to cancel direct Office 365 subscription paid by credit card, the main question is how to switch those licenses without loosing mailbox and other settings?


It is very simple!


After cancelling the direct Office 365 subscription, system will recognize EA licenses automatically. You can contact your regional billing support team to proceed subscription cancellation.

How to move existing O365 users to Enterprise Agreement?

  1. After paying for the Microsoft Enterprise Agreement, there should be an email which confirms the information that you have successfully bought it. In that email, there is a link that will lead you to bind the licenses with your Office 365 subscription.
  2. Click that link and there will be the page asking for your existing Office 365 administrator account credentials.
  3. Finish the process with the wizard.
  4. Then you can sign in to Office 365 admin center to assign the licenses to your existing users and then reduce the “previous” licenses if necessary.

Limits on syncing OneDrive for Business

  • You can sync up to 20,000 items in your OneDrive for Business library, including folders and files.
  • You can sync up to 5,000 items in site libraries, including folders and files.
  • In any library, you can download files up to 2 GB.

WFC connection problem in SPD2013

In Microsoft SharePoint Designer 2013, an external content type against a WCF service could show the following error:

Unknown Error occurred. Unable to load one or more of the requested types. Retrieve the LoaderExceptions property for more information.

Reason? This issue occurs because the DLL version that’s returned form the server doesn’t match the one in SharePoint Designer 2013.

Solution? Replace the content of C:\Program Files (x86)\Microsoft Office\Office15\spdesign.exe config file with the following code:

<?xml version="1.0" ?>
<configuration>
 <startup>
  <requiredRuntime version="v2.0.50727" />
  <supportedRuntime version="v2.0.50727" />
 </startup>
<runtime>
 <assemblyBinding xmlns="urn:schemas-microsoft-com:asm.v1">
  <dependentAssembly>
   <assemblyIdentity name="Microsoft.BusinessData" publicKeyToken="71e9bce111e9429c" culture="neutral" />
   <bindingRedirect oldVersion="16.0.0.0-65535.65535.65535.65535" newVersion="15.0.0.0"/>
  </dependentAssembly>
 </assemblyBinding>
</runtime>
</configuration>

How to create email alias in Office 365 Small Business Premium?

1) Log into the admin center with the admin account.
2) Click the “Outlook” tab in the top panel to enter OWA (Outlook Web App).
3) In the address bar, change the URL after “owa” to “ecp”. For example, if the URL of your Outlook Web App is https://server.outlook.com/owa/?exsvurl=1&ll-cc=1033&modurl=0&realm=domain.onmicrosoft.com, please change it to https://server.outlook.com/ecp/ to enter your Exchange admin center.
4) Click recipients on the left navigation.
5) Click mailbox on the right panel and double-click the display name of the mailbox you want to edit.
6) Click email address on the left navigation.
7) Click add icon to add an email address for this account.

Sorry, we can’t get that information right now. Please try again later. If the problem continues, contact your helpdesk.

Exchange online error: Sorry, we can’t get that information right now. Please try again later. If the problem continues, contact your helpdesk.

Solution:

  1. Log in to the portal of Office 365 through https://portal.microsoftonline.com/ with an administrator account.
  2. Click Add users, reset passwords, and more under users & groups.
  3. Select the “failed user”  .
  4. Click licenses.
  5. Uncheck the box of Exchange Online and click save.
  6. Wait for 15 minutes, re-do the steps above and check the box of Exchange Online.
  7. Click save and try again.

Messages sent from a shared mailbox aren’t saved to the Sent Items folder of the shared mailbox in Outlook 2013

SOLUTION:

  1. Click Start, click Run, type regedit, and then click OK.
  2. Locate and then click the following registry subkey:
    HKEY_CURRENT_USER\Software\Microsoft\Office\15.0\Outlook\Preferences
  3. On the Edit menu, point to New, and then click DWORD Value.
  4. Type DelegateSentItemsStyle, and then press Enter.
  5. Right-click DelegateSentItemsStyle, and then click Modify.
  6. In the Value data box, type 1, and then click OK.
  7. Exit Registry Editor.