How to use mklink for OneDrive For Business content sync?

By default, OneDrive will sync only the content inside its main folder. In such cases you need to copy all files and folders in the predefined location on your C partition. In any case, after some period of time, you will forget to copy some important data, and expose your data to the chance of content loss. How to prevent that?

Yes, you can automate all those backups for any folder on your Windows machine! To make OneDrive sync a folder which is not located in your main OneDrive folder, you have to  create a directory junction with mklink. You can simply create a symbolic link on local machine to sync important data from any folder into OneDrive For Business folder.

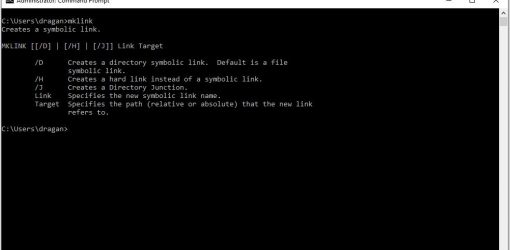
Correct syntax:  mklink [options] <Link> <Target>

Target is the file/folder that exists, and Link is the created one that links to the target. For Options type /j

Example:

  1. Open Command Prompt (Run as administrator)
  2. Type the following command: mklink /j “%UserProfile%\OneDrive\Folder name” “The full path to your folder”. You have to replace the ‘Folder name’ part with the desired name which will reproduce your folder in the OneDrive storage. Also, provide the correct path to the destination folder that you want to sync. For example:
    mklink /j “%UserProfile%\OneDrive\MyBackup” “c:\Contracts”

Important:

  • mklink can’t transmute directories into junctions, so the folder name (<Link> argument) has to be available before it can create the junction

Database Connector has throttled the response. The response from database contains more than ‘2000’ rows – error on external list in SharePoint

By default, SharePoint will try to fetch 2000 rows for external list, and in case you get this error, the only way is to increase default settings by simple Powershell command in a few easy steps.

Error:
Database Connector has throttled the response. The response from database contains more than ‘2000’ rows. The maximum number of rows that can be read through Database Connector is ‘2000’. The limit can be changed via the ‘Set-SPBusinessDataCatalogThrottleConfig’ cmdlet.

Solution:

  1. Log in to SharePoint server
  2. Start SharePoint Management Shell as administrator (right-click, run as administrator)
  3. Execute the following command: Get-SPServiceApplicationProxy
  4. Note the ID value for “Business Data Con” application
  5. Execute the following:  $serviceapp = Get-SPServiceApplicationProxy -Identity 9b2e386e-ffee-455f-a416-302ff0aed069 (replace identity ID with your value from previous step)
  6. Execute the following command:  Get-SPBusinessDataCatalogThrottleConfig -Scope Database -ThrottleType Items -ServiceApplicationProxy $serviceapp | Set-SPBusinessDataCatalogThrottleConfig -Maximum 1000000000 -Default 500000
  7. Restart IIS (iisreset /noforce)


How to connect to SharePoint Online from Power Shell?

Install-Module -Name Microsoft.Online.SharePoint.PowerShell

$adminUPN=”dragan@company.onmicrosoft.com”

$orgName=”company”

$userCredential = Get-Credential -UserName $adminUPN -Message “Type the password.”

Connect-SPOService -Url https://$orgName-admin.sharepoint.com -Credential $userCredential

How to setup Shared mailbox from Exchange Online on Android mail client?

First of all, it will be IMAP connection, don`t try to use wizards for Exchange or Office 365, simply it won`t work.

  1. Open you mail client and select IMAP as account type
  2. For “E-mail adress” field use you shared e-mail address. Username should be you main address\shared (eg. info@company.com\dragan.todorovic). For Password simply enter you main address password.
  3. IMAP server: outlook.office365.com, Port: 993, Type: SSL\TLS (Accept all certificates)
  4. SMTP: smtp.office365.com, Port: 587, Type: STARTTLS (Accept all certificates)
  5. Check “Require Sign-In
  6. For username set your main email account (eg. info@company.com) and password for this account
  7. Confirm!

Push declined due to email privacy restrictions error for GitHub sync in Visual Studio Code

If you have experienced Visual Studio Code at least for simple script editing and tried to connect to GitHub as source control, probably you had a problem with sync because of this error in log output:

remote rejected] master -> master (push declined due to email privacy restrictions)

Fix: Simply uncheck “Block command line pushes that expose my email” box in your email settings and then pushing again.

“Save as site template” option is missing in SharePoint Online

As you probably know, once the publishing feature is activated the ‘Save site as a template‘ option will be unavailable in Site Settings. If you try to disable the feture it won`t resolve the problem, since onlu one activation will change the settings for all sites. However, there is a workaround as described below:

First ty to navigate directly to http://yoursite/_layouts/15/savetmpl.aspx  and you will get the form for creating template. Simply fill in the form and you`re done.

If you get some error, then you need to connect to SharePoint Online via powershell first, and execute the following commands:


$web = Get-SPWeb http://your_ site
$web.AllProperties[“SaveSiteAsTemplateEnabled”] = “true”
$web.Update()


then try to access above URL again!

SharePoint Designer 2010 cannot display the item

If you face the problem with “SharePoint Designer cannot display the item” in SharePoint Designer 2010, proceed with the following steps;

  1. On the local computer, browse to the following folder:
    • C:\Users\<Replace Your User Name>\AppData\Local\Microsoft\WebsiteCache
    • Example: C:\Users\mark.lee.contoso\AppData\Local\Microsoft\WebsiteCache
  2. Delete everything in WebsiteCache folder.
  3. On the local computer, browse to the following folder:
    • C:\Users\<Replace Your User Name>\AppData\Roaming\Microsoft\SharePoint Designer\ProxyAssemblyCache
    • Example: C:\Users\mark.lee.contoso\AppData\Roaming\Microsoft\SharePoint Designer\ProxyAssemblyCache
  4. Delete everything in ProxyAssemblyCache folder.
  5. Done.
  6. Open SharePoint Designer 2013